IAG's braided turbo oil line install. More flex for less breakage.
Every car part has it’s breaking points, some are more subject to failing often. While others may not fail all the time but when they do it can be catastrophic. The Subaru turbo feed line is one of those, I have read forum posts about it cracking and know that it could empty your engine oil without many signs. Hopefully, you would catch a smoke signal from under the hood or a wiff of hot oil spraying down the exhaust, but you can never be too safe.
I have completed this on two cars. Both have been down for major repairs when I installed them. So the intake manifold, turbo and exhaust were removed, which does make this a lot easier. If you are doing this on an engine inside the car with all these parts installed, my recommendation would be to cut the old hardlines off. It just makes life easier and who would ever reinstall them.
Time Frame
As stated above I always installed this with very few installed components on the engine making it much easier. I would put back around two to three plus hours if you are leaving everything connected. If you happen to be upgrading your uppipe, turbo, or intake manifold, this would be an excellent time to install this as it opens up your work area immensely.
Tools
Our typical assorted metric sockets and ratchets are called into action for this job. My favorite as you might know are Grey pneumatic as they are a great value and I have yet to break a socket over my last 8 plus years of use with them.
Next on your list will be a set of ratcheting wrenches, these help you squeeze into those tough areas and quickly remove those bolts that are very difficult to access.


Power tools always help save your body from wear and tear and speed up the process immensely. These are among my favorites.
Milwaukee 3/8ths electric ratchet Milwaukee 3/8ths impact gun

A torque wrench will round out your tools to keep you from over tightening these bolts. Damaging the threads of any of these will result in a very awful day.
Parts
Iag supplies everything you need for this install. The items inside the packaging determined by your setup will be new o-rings, the stainless braided lines and fittings for these.
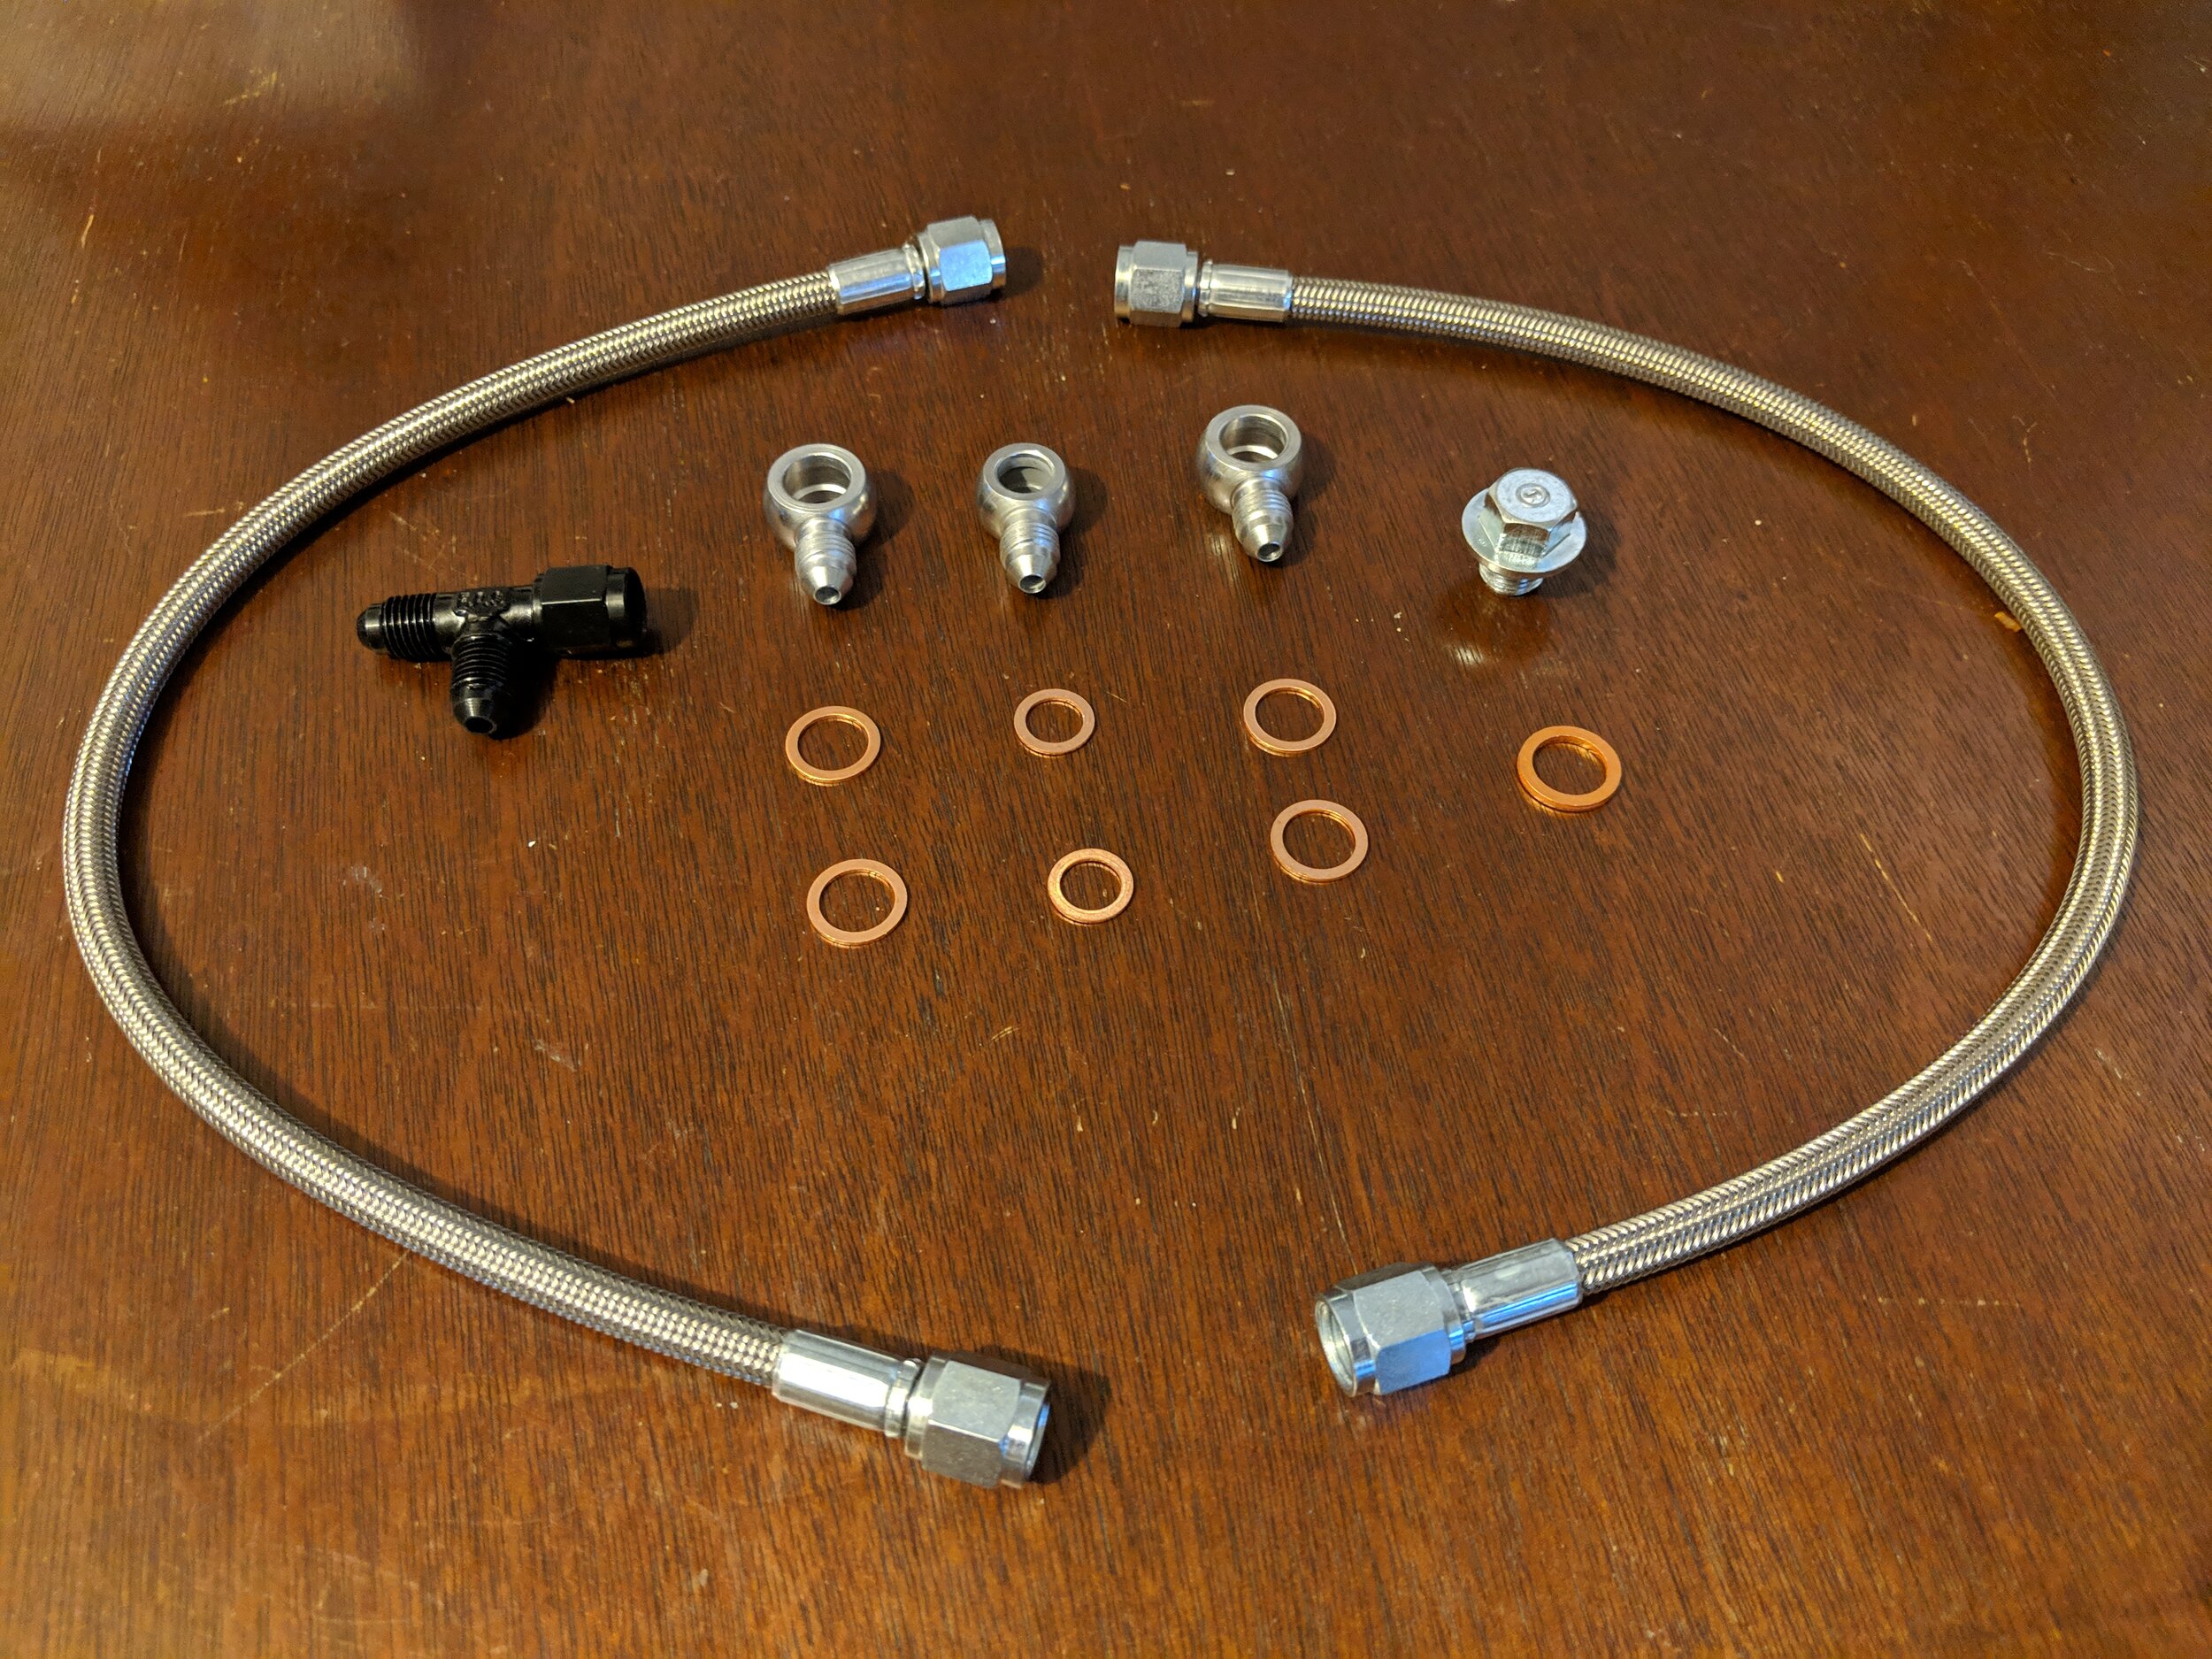
Here is everything included in the Iag kit.
Note prior to install
On my 05 STi there are only two ports, the turbo feed on the backside of the head and the AVCS at the front. Making this very doable with the engine in the car. On my 06 Forester there is an additional oil feed that is located underneath the turbo inlet. If you are removing your factory turbo inlet to upgrade it, this would be a perfect time to install the IAG oil lines, as getting to this banjo bolt might be impossible without intake manifold or turbo inlet removal. Take note of your setup and hardlines before starting, otherwise you might be in for more than your bargained for.
My STi uses the factory B25 heads and the Forester uses the factory D25 heads. This is most likely the reason for the changes in setup, but once again just double check your setup before starting, Iag has a great set of images on their site, below you will find the two differences too.
Installation
As stated above I installed these on both of my engines with them removed from the car making it far easier. It can be done with everything in the car just with a bit more work. So if your engine is out for any reason this is a great time to add this to it. It will save you plenty of time and hassle when you don’t have to deal with the hardline.
With your hood open you can start at the easiest to reach banjo bolt. It is located underneath the intake tube. Removing the air box and loosening the two hose clamps will free the tube and box. Set them to the side.

With the top of the air box and air intake removed you can your way to the bolt that feeds the Acvs.
Next up we will locate the passenger side head oil feed hole. This is located just under one of the support brackets for the turbo. With a few fancy wrench turns you can remove this and get a visual on the banjo bolt and hardline.
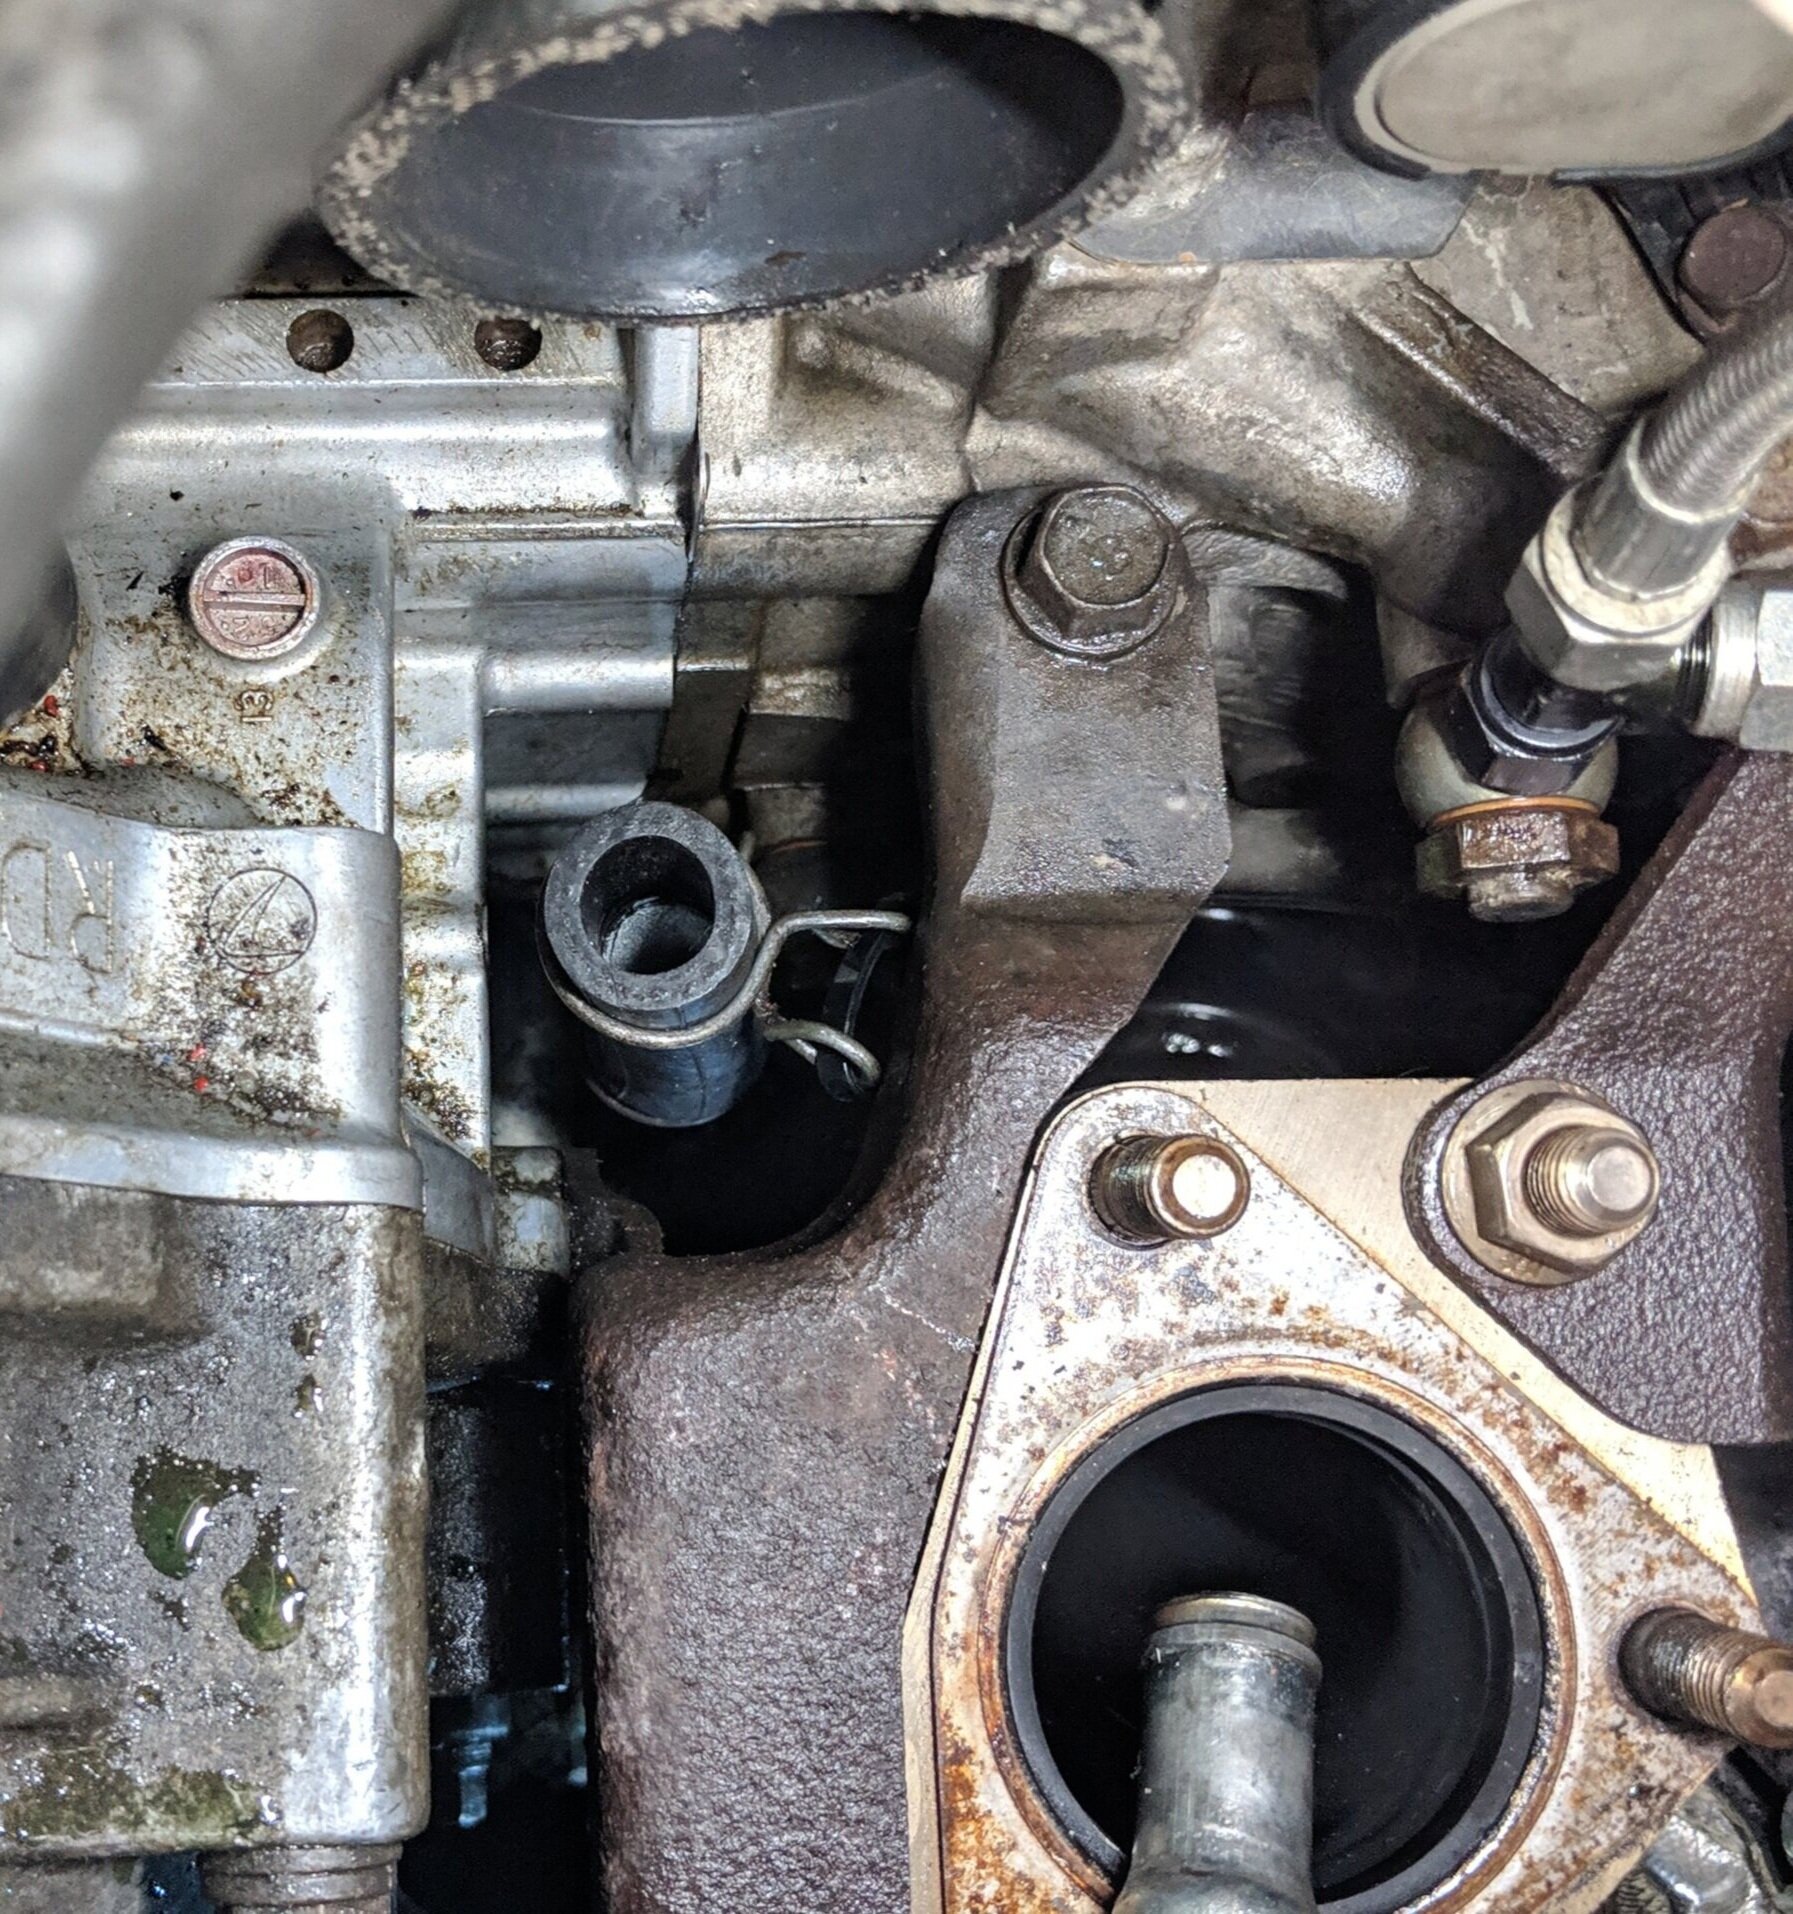
This is a top down with the turbo removed shot to give you an idea of the rear oil feed location. It is not easy to see but the bracket to the right banjo bolt head holding up the turbo. You can reach this without removing the turbo, but in this example it has been removed.
I would start by removing this banjo bolt on the backside of the head first. If you can’t remove this banjo bolt your plans of completing this modification. Once this banjo bolt is removed you can trace the hardlines and loosen the banjo bolt located on the Avcs and turbo.

This shot will give you another visually on the location without the banjo bolt installed. The larger threaded hole near the cylinder port is an oil galley that isn’t really accessible without the turbo inlet off or the intake manifold removed,

Here it is with the hardlines and bolts visible. Starting from the large bolt head in front of the turbo you can trace the line down and follow it to the Acvs unit. If you are doing this on your Forester and this is your setup, intake removal is pretty much necessary.

Here is a view of the bolt above through the turbo inlet area, without the turbo inlet. You can just see the shiny bolt head through the fuel lines. You could do it like this but you have very tight quarters to work in.
This is where the configuration of your engines lines is important. If you have the setup as outlined in my above notes for my Forester, you will need to remove the turbo inlet at the least and struggle through the fuel lines to remove the banjo bolt. Intake manifold removal would be the best option here, for directions on this follow this link. If your setup is like my STi with just the two ports you should be able to complete it without removing the manifold, the trickiest part being the banjo bolt near the turbo. Once again check your setup before starting or be aware.

This is the front Avcs bolt on the Forester, the top feed rails and lines cover it… Without removing the intake manifold it is safe to say this won’t be an easy task. You can loosen the fuel lines and shift them, but moving them too far could cause a crack or break.
Now would be the time of figuring out how to remove the hardlines. For me this is reminiscent of installing an upgraded turbo inlet. Whatever it takes to remove it will occur, as there are not many out there looking for a stock inlet. Bend it, break it, cut it.. just get it out your way.

The two hardlines are visible, one being the turbo feed line and the Acvs line that starts in the center of the photos and runs to the passenger front. The front Acvs line runs to the middle of the D25 head. The hardline runs underneath the turbo inlet and back to the head.
With the hardlines removed you can start routing the new braided lines. I tend to start with the oil feed located on the back of the passenger head. With the proper fitting, washers, and banjo bolt.
Start by loosening or removing the turbo bracket closest to you when standing on the passenger side of the car. This bracket is the biggest hindrance to your installation.
This fitting needs to be installed properly to allow the lines to go around the turbo bracket that is situated right about them. If you do not have it located properly the fitting and bracket will obstruct each other, I wouldn’t recommend tightening down the banjo bolt or lines completely, as you make sure they won’t interfere with one another.

Here the turbo feed bolt and banjo are being installed. I left the bolt loose till the turbo mounting bracket(turbo mounting bracket is removed in this image) is in place, this way I can move them around and make sure they have proper clearance. Use your thickest washer on the side closest the block to allow for the fittings to clear.
With the rear of the head fitting dealt with you can move forward on the engine and install the fitting into the Acvs fitting. You can now fully install the new banjo connection and bolt, I tend to leave the line loose till I have everything lined up as stated above.

Close up on the T junction location. The turbo bracket rests just below part of the T junction is quite a tight fit.

Wide shot of the direction the lines off the T junction without the turbo in the way.
We can now move to the turbo, with the line removed you can now route your path determined by your heat shield setup. Since both of my cars run aftermarket downpipes I utilize a chopped up version of the factory heatshield, with this you get rough jagged edges. Given this, I take a piece of vacuum hose and run it across the edge to protect the line.

Line routed up to the turbo.
With all your lines routed this would be the time to torque them all down. Double check your lines to make sure they aren’t obstructing another line or in a location that could cause wear over time. I.e. Wiring, rubber hoses, etc, You don’t want this preventative repair to cause you other headaches.
You can start reassembling any other parts you removed to help aid this install. After fitting these parts we will start the engine and allow it to run for around five to ten seconds. If you have a helper this is a good time to have them watch your fittings during the engine starting, if any connection was left loose you will now have a good quantity of oil spilling from it. If all your fittings check out you can now run the car for a extended time and take a short trip around to make sure everything is functioning properly.
Congratulations! You have completed your IAG oil feed install! No longer will thoughts of this line breaking come into your head. If you ever need to pull the turbo off or the engine it will be a much easier task with these hardlines removed, if only these braided lines came stock…
Amazon links
Milwaukee 3/8ths electric ratchet
Grey Pneumatic 3/8th socket set
Grey pnuematic wobble socket set
Gearwrench ratcheting wrenches.
Amazon Part links
Iag turbo and AVCS oil feed line